
Manual & Safety
Power Supply Socket for Starlink Mini (Indoor/Outdoor)
Model LG-MIRUBU
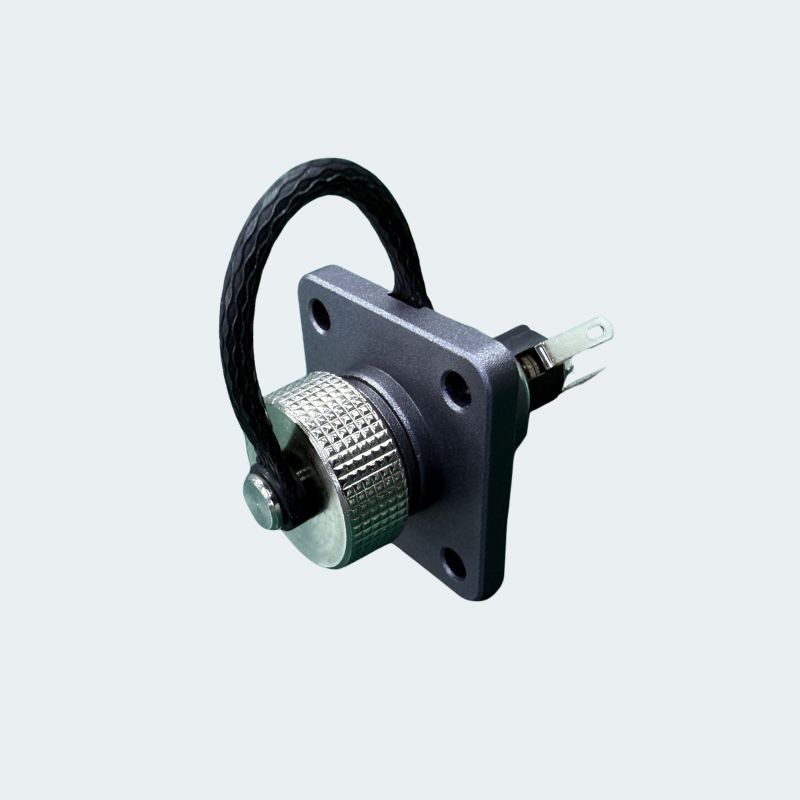
Package Contents
1 x Metal panel-mount power socket for Starlink Mini, with metal protective cover
⚠ WARNINGS & Safety Information
- Before using the device, carefully read this manual.
- Keep this manual either downloaded or printed in a safe place for later use. It contains important information.
- Never connect the device to 230/110/mains voltage! This is extremely dangerous.
- Avoid placing any objects that could short-circuit the power cables.
- The rear solder tabs must be connected by a qualified person using proper soldering technique and correct polarity.
- Securely mount the device in a stable panel or wall cut-out to prevent it from loosening or falling out.
- The device should not be opened or repaired by unauthorized personnel.
- Only use the device within the specified voltage and power limits (12V/24V, max. 48V DC; max. 100W). Do not overload the device.
- This socket is only compatible with Starlink Mini. Do not use it with other Starlink generations or devices.
- Ensure you are using an appropriately dimensioned cable for the connected load to prevent overheating.
- For outdoor installation: the metal protective cover must always be fully closed and securely screwed on whenever the power plug is disconnected, to keep out moisture and dust. Failure to do so may damage the device.
Technical Specification
| Input voltage | 12V, 24V or max. 48V DC |
| Recommended power | up to 60W |
| Maximum power | up to 100W |
| Housing | Metal housing with metal protective cover |
| Front connector | Round plug (Starlink Mini) |
| Rear connection | Solder tabs |
| Mounting type | Panel / chassis mount |
| Compatibility | Starlink Mini only |
Compliance


Additional (compliance) labels for your region may be found on the packaging or the device itself.
Disposal
This appliance complies with the European Union's WEEE directive (2012/19/EU) on responsible end-of-life handling.
- Packaging: Eco-friendly materials make it easy to recycle. Send that cardboard on its next adventure or recycle it accordingly.
- Waste equipment: Don't let it gather dust! Your local retailer or recycling center gladly welcomes it back for reuse or responsible recycling. Ask them for the latest disposal routes, and watch your old appliance become something new!
Installation
Mount the socket into a suitable panel or wall cut-out matching its housing. Solder the supply cable to the two rear terminals, observing correct polarity, and use an appropriately dimensioned cable for the intended load. Then plug the original Starlink Mini power cable into the front-side round connector.
Wiring Diagram / Polarity
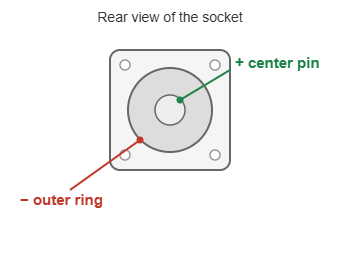
The center solder tab is positive (+). The two outer solder tabs are both negative (−). Connecting the supply with reversed polarity may damage the device or the connected Starlink Mini.
If installed outdoors, always ensure the metal protective cover is fully closed and screwed on tightly whenever the socket is not in use, to keep moisture and dirt out.
Operation
This socket passes the connected DC supply straight through to Starlink Mini - it contains no conversion or switching electronics. Before use, make sure the connected power source matches the specified voltage range.
Maintenance
Keep the connector contacts clean and dry. Wipe the housing with a dry, lint-free cloth. For outdoor installations, periodically check that the protective cover still seals properly.
If you have any issues, please contact our support team.
We are not affiliated, associated, authorized, endorsed by, or in any way officially connected with Starlink, SpaceX, or any of its subsidiaries or affiliates.
Imported by performeon GmbH, Rodgasse 5, 97828 Marktheidenfeld, Deutschland
support@linkgear.net ● +49 (0) 9391 6099 880
Developed by performeon GmbH together with Yaosheng
No comments to display
No comments to display